


Your Own Payment System with Stripe API
Your Own Payment System with Stripe API
A complete guide. From start to finish.

A complete guide. From start to finish.
Nowadays, it is increasingly common to pay for products or services through a website or mobile application. The ease of accepting payments through these sites and mobile apps is therefore simplified by many payment gateways.
For online businesses, a Stripe is a great option for processing payments. Individual developers should integrate Stripe into their e-commerce projects.
The chances are that you already have some basic knowledge of Stripe if you are taking this article. This articleis your ultimate guide to learning everything about Stripe, even if this is not the case.
Stripe Overview
The first thing you need to know about Stripe is what a payment gateway is. Payment gateways take the customer’s billing information and pass it along to an e-commerce site or app. Payment gateways are intermediaries between credit/debit card companies and business accounts. Upon confirmation, the payment gateway sends the charge details to the business account, along with the card information. The app making the payment request also receives the same charge details.
Stripe is a popular payment gateway. Their API and robust platform enable businesses and individuals to accept payments. Providing various payment options, Stripe eases the process of starting and managing internet businesses.
Features
Business payments — Stripe provides e-commerce businesses and platforms with a complete set of payment solutions. They are able to manage subscription billing through these solutions and accept payments via a variety of channels.
A very user-friendly onboarding process — Stripe’s onboarding is very easy to use. The libraries and SDKs to accept payments can be downloaded in minutes.
Revenue optimization — Stripe detects fraud by utilizing machine learning techniques and increasing authorization rates.
Businesses can accept payments globally using Stripe’s payment methods, increasing conversion rates dramatically.
Developed for developers, Stripe SDKs and libraries are production-build-ready, and they integrate well with legacy applications. Stripe makes accepting payments simple, so you can focus on your customers and products.
Article prerequisites
JavaScript, React, NodeJS, and MERN stack applications are assumed, as well as how to install them locally. This article can be taken after you become comfortable with these technologies if you are not yet proficient in them. A candidate who wants to learn about Stripe SDKs and libraries (both client and server) to enable payments in their apps will benefit from this article.
Setting up a Stripe account
It is fairly easy to set up a Stripe account.
First, go to
https://stripe.com
and click on the Start now button.

After that, you’ll be redirected to the registration page, where you’ll need to enter your details and click Create Account.

Lastly, you will be able to access your test dashboard. Your developer API keys are located here, so you can view reports, transactions, customers, and more. Stripe may restrict your account if you don’t verify your email address.

You are only able to access test mode as your account is not yet activated for accepting real payments.
Regulations and Workflow for Online Payments
Find out how online payments work and the regulatory terms involved.
Online payments: how do they work?#
Stripe Payment is a platform for handling payments. Using a credit card or debit card transaction, you can charge money from a client’s or customer’s bank account into your business account. We should first understand how online transactions work and the different steps involved in them before we discuss how payments can be integrated.
There are four main actors in every online transaction.
Credit or debit card holders are actors or individuals who hold the cards.
An actor who owns a business is referred to as a merchant.
Acquirer banks handle card payments for merchants and forward them to the issuing banks via the card networks (Visa, MasterCard, RuPay, etc.). Besides partnering with third parties, acquirer banks also process payments on their own.
Card networks distribute cards and provide credits through issuing banks to consumers.
Establishing a business bank account and partnering with a payment processor or acquirer is the first step. A payment processor and acquirer help merchants transfer payments from their online store or app to card networks. Merchants may have separate entities for acquirers and processors or they may handle both services through a single entity.
Payment gateways, which encrypt sensitive information, are also necessary for merchants to accept payments securely. In order to meet security guidelines called PCI Standards, payment gateways commonly use a tokenization technique to decouple payment information (card details) from the app.
Payment gateways encrypt card details and securely transmit them to the acquirer and then to the card networks when a payment is initiated. It is then handed over to the issuing bank by the card network. Payments are either accepted or rejected by the issuing bank based on the regulatory rules and additional verification of the card. Upon receiving the status of the payment, the gateway or acquirer notifies merchants via their screens whether the payment was successful or unsuccessful.
Regulatory terms and definitions
Developing online transactions requires knowledge of different regulations and terminologies. As important as developing secure payment flows is staying up-to-date with new security standards. In the event that the issuing bank does not support new regulations, payments will be declined.
Second Payment Services Directive (PSD2)
Payments are made safer and more secure through the Second Payment Services Directive (or PSD2). In addition to mandating 3D Secure for customers, it encourages banks to use protocols such as SCA and modern technologies to facilitate open banking.
Compliance number for the Post Card Industry (PCI)
Businesses like Stripe must abide by the PCI Data Security Standards when processing, transferring or storing sensitive data such as card details.
SCA (Strong Customer Authentication)
In order to verify their payment, customers must enable a two-factor authentication process, such as 3D Secure, as part of the Strong Customer Authentication requirement. For merchants to charge customers and avoid rejection from their banks, they must support SCA.
3D Secure
In order to ensure that card transactions are more secure, 3D Secure is a protocol that allows additional authentication. Merchants are protected against counterfeit payments by it.
Authentication code for cards
Authentication of the card is an additional step the customer must complete before the payment can be authorized. An email or mobile number is sent by the bank to the customer with a verification code, which must be entered into a secure channel.
Stripe API Keys and Intents
APIs built with Stripe follow the REST paradigm. Form-encoded request bodies and standard HTTP status codes are returned by the Stripe API.
In addition to Ruby, Python, NodeJS, PHP, .NET, and Go, Stripe has excellent server-side libraries. Curl can be used as a terminal interface to test APIs, if you prefer the old-school approach.
Stripe is a NodeJS NPM library that you will be working closely with throughout this article.
Stripe’s dashboard provides Developer API keys that you will need before proceeding.
API keys: Getting them
From the sidebar, select Developers.
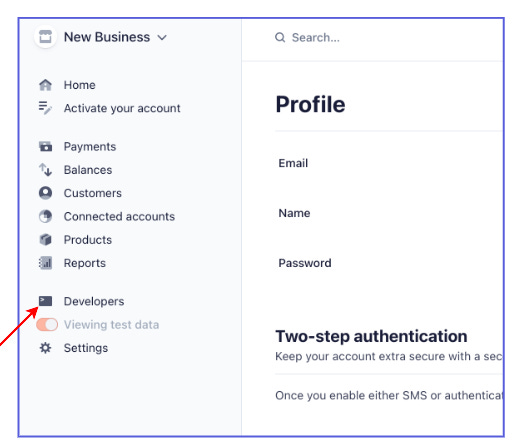
Under Developers, click API keys.
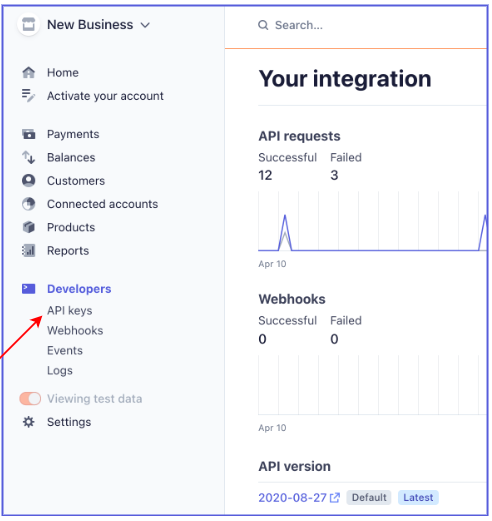
Take a look at the page and grab your Publishable and Secret keys. You can access the secret key by clicking on the Reveal test key button, which will hide the secret key by default.

Payment Intents
A payment system that can handle complexity is built using Payment Intents. With Payment Intents API, the payment can be tracked from initialization through the entire checkout flow, as well as when additional verification steps are needed.
Authentication steps may be required if additional processes are involved, such as fraud rules, regulatory mandates, redirects based on payment types, etc. The transaction will not be complete and will eventually fail if the payment integration does not take care of these cases.
Payment Intent API from Stripe offers the following features:
Authentication handled automatically
Charges are not doubled
SCA (Strong Customer Authentication) support
You can use the Payment Intents API in combination with the Setup Intents API to create an integration that is flexible, can handle complicated cases, and can handle additional authentication steps, such as 3D Secure.
The Payment Intents API’s integration comprises two steps:
Creating a Payment Intent
Confirming the Payment Intent
Intents Setup
Setting up payment methods for future payments is done using the Setup Intents API. Payment credentials can be saved and optimized for future use. Business owners who do not charge customers immediately and initiate payment only after the service has been rendered may find this useful. A hotel owner, for example, can collect the card details from the customer at the time of check-in, verify the information, and only charge the card once the customer checks out.
Interacting with Stripe API
Authentication
It is possible to authenticate your requests using the API keys that Stripe API provides. In order to ensure the security of your API key, which grants complete access to your account, you should store it securely. You should not push it to any public repository.
It’s time to start interacting with Stripe using the secret key we have just created. This key needs to be provided in the widget that follows. Upon providing the key, it is immediately stored in the SECRET_KEY variable in line 3 as soon as it is provided. This key is then passed to the Stripe() function in line 5 where it is used to make further requests using the object that will be returned by Stripe().

Getting a single product
The Stripe dashboard must be filled out before running the code.
On the sidebar, click Products. Select Add product from the menu.

In order to enter product details, you’ll be redirected to a page. Set the price to $0.00 (or any other price) and add a random name. You can then save the product by clicking the Save button.

As soon as the product has been created, it will be assigned an ID. This ID can be copied and pasted in the PRODUCT_ID field of the widget below, in the field PRODUCT_ID of the widget.

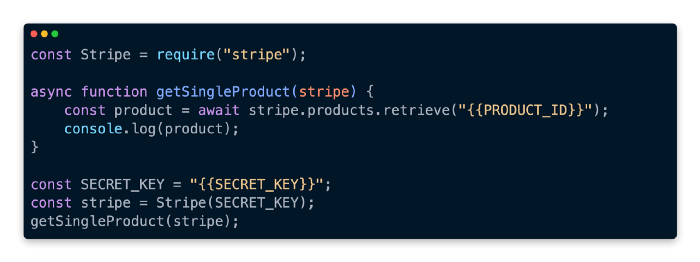
Upon receiving the returned JSON at your end, you will find that it has similar properties as shown below:

Product listing
Your account’s products can be listed using the products.list() method.
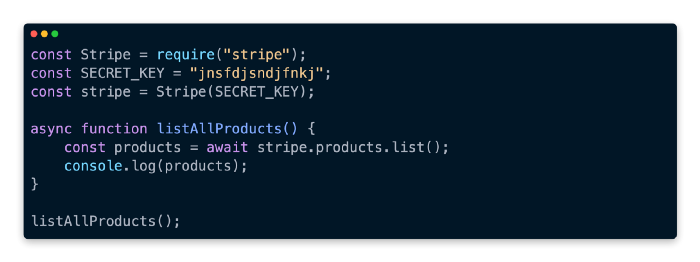
Using the params object you can pass additional parameters to this method, such as a limit, the ids, etc. It is possible, for example, to retrieve only three products using the following implementation of listAllProducts(). If you place the code in the widget above, you will be able to test it.

Creating a Checkout Experience
Server Setup
During this chapter, we will learn how to build a complete checkout journey so that our customers can have a pleasant checkout experience. The purpose of this tutorial is to demonstrate how Fake Store API can be used to simulate an e-commerce store. Using the Fake Store API, we will be able to retrieve products and cart details as well as process the payment with the help of Stripe and Stripe Elements.
This chapter will be dealing with an application that consists of two components: a frontend and a backend, and we will be interacting with both throughout the chapter. In order to understand how this application works, we will look at the directory structure as follows:

In this lesson, we will focus on the backend folder of the application directory, since we will be setting up the server. In the next lesson, we will discuss the front end.
In the following widget, you can find the complete code for the relevant files in the backend folder:
Backend

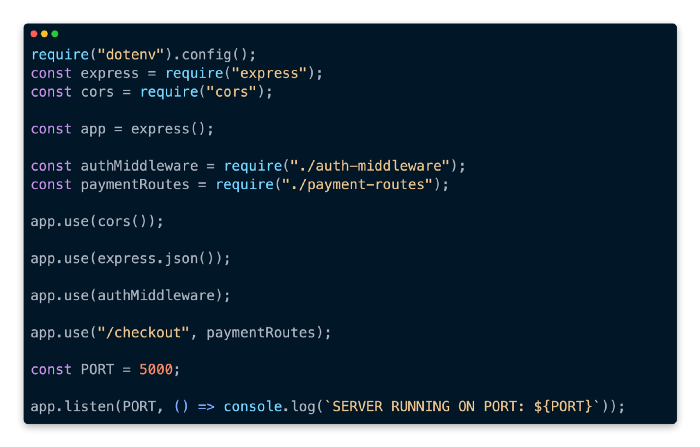


Trying to understand the code in these files will be easier if we go through them one by one.
Authenticating the identity of the customer
Taking this example to the next level by simulating API authentication and authorization in order to make sure that only valid users or clients have access to the backend services in this example will make it more realistic.
The authentication middleware is created in the auth-middleware.js file in order to implement API authentication. The purpose of Express middleware is to intercept any request that is going to be handled by the route handler function before it is delivered to the middleware itself.
You need to check if the authorization header value exists in the middleware function before you start using it. In order to authenticate the API requests from the client, we will pass the userId in the authorization header as a parameter. In a real-world use case, the authorization header contains API tokens for authenticating users, while here, we are keeping it simple for simplicity’s sake. Finally, in order to be able to access the userId in the route handler, attach it to the req object as part of the last step.
The app.use() method should be used in index.js to attach the authMiddleware middleware.
Before checking out, fill the cart with items
Assuming this is a real-world example, the store-service.js file will handle all the business logic necessary to retrieve data from the Fake Store API.
Bill generation
Create a post route method to create a Payment Intent in the payment-routes.js file using the Stripe Secret key. The store service should also retrieve the items in the user’s cart.
The paymentRoutes routes should be attached to the server via app.use() in the index.js file.
Create the checkout form
Let’s begin building the checkout flow on the client side now that the server is ready for payments. The frontend folder in the application directory will be our focus here.
Frontend
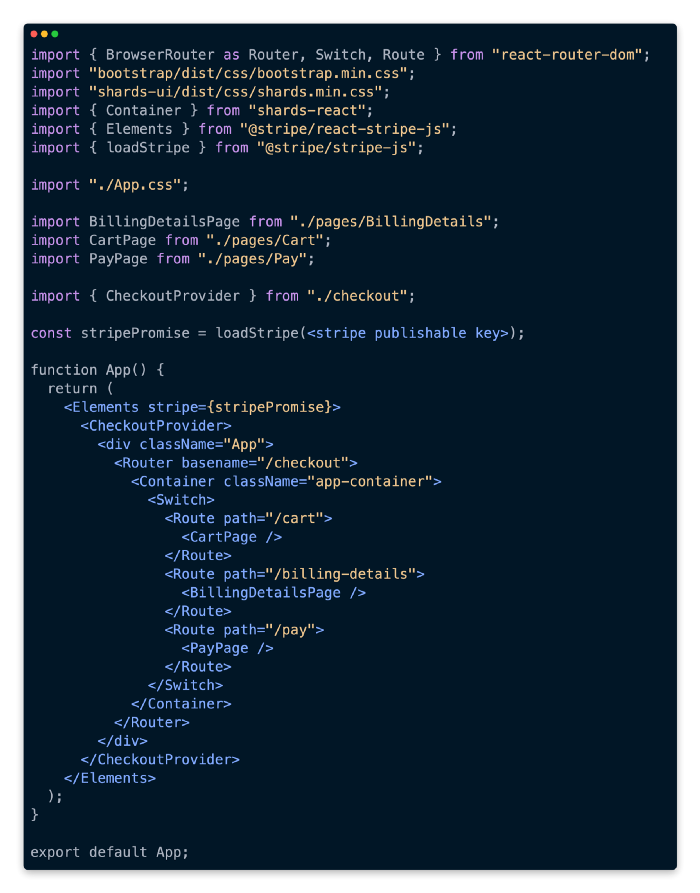


Getting to the checkout
The frontend of the application has three routes:
(pages/Cart.jsx) is the page where the cart is displayed.
There is a Billing Details page which can be found at pages/BillingDetails.jsx.
(pages/Pay.jsx) is the page for the payment process.
1. Cart page
The pages/Cart.jsx file displays a simple list of the items in the customer’s cart as well as the total transaction amount of the order in the Cart component of the page.
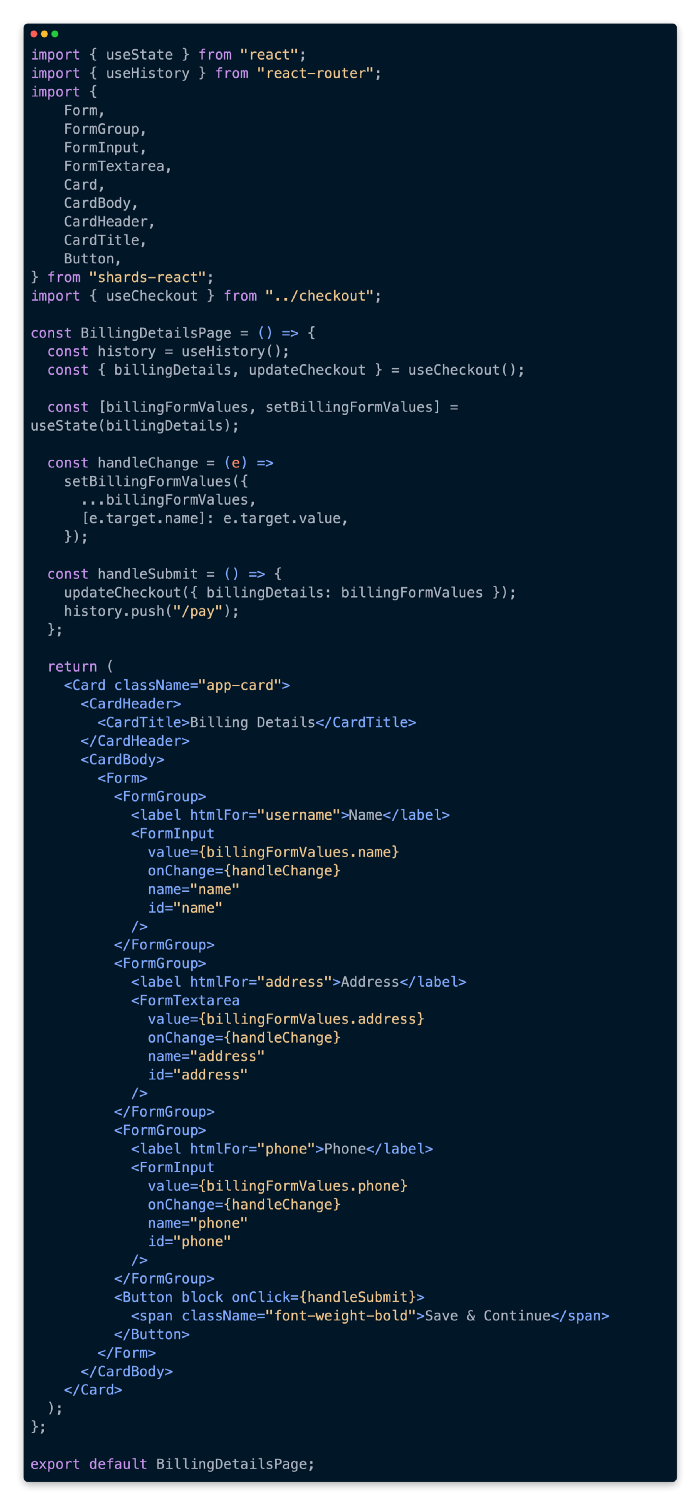
2. Billing Details page
Page/BillingDetails.jsx contains a BillingDetails component in which the customer’s billing information can be entered. A component’s local state will store all form values. A user will be taken to the payment page once the submit button has been clicked.
3. Payment page
Using the @stripe/react-stripe-js package, we import useStripe, useElements, and CardElement.
We can use the useStripe hook to gain access to the stripe object reference that has been passed as a prop to the Elements provider component in order to access it. We use the useElements hook in order to securely pass the card information collected by an element to the Stripe API, as well as accepting the credentials from the customer through the CardElement component. It is not necessary to create a payment method in order to accept payments. Due to the fact that the Payment Intent has already been created at the start of the checkout flow, we are able to confirm the payment directly.
If the payment button is clicked, this method should be called using the stripe.confirmCardPayment method passing the checkoutSecret and the billing information. It is possible for us to show a success message to the user if the Payment Intent status is “succeeded”, meaning that the payment has gone through and the payment has been successful.
Router setup and Stripe initialization
By providing the Stripe Publishable key in the loadStripe method of App.js, set up the Router using the page components. By wrapping the Router component in the CheckoutProvider component, the context state will be accessible throughout all components of the page. For shards-react components, you should also include the bootstrap and shards CSS files.